Thursday, May 2, 2013

Perfect Cinnamon Buns


The smell of freshly baked cinnamon buns is just heavenly!  The warm fragrances of brown sugar and cinnamon is irresistable.  I've attempted making cinnamon buns before but failed miserably.  I was pretty much scarred and never wanted to waste that much bread again.  But, I got a little brave last week and thought, let me just give it a try with my own recipe!  I took my pizza dough recipe and mashed it up with another bread recipe to come up with the recipe for this sweet bun.  The final product actually turned out wonderful and I was finally satisfied!

Give it a try.  Do not be intimidated by yeast.  It won't bite...promise!


Perfect Cinnamon Buns
Makes 30 large buns

Bun
1 cup         warm water (100-120 F)
4 Tbsp       quick active yeast (I use Fleishmann's)
2 Tbsp       honey
1 cup         milk
8 cups       unbleached all purpose flour
1/2 cup      melted butter
2                eggs, lightly beaten
1 cup         sugar
3/4 tsp       salt

Filling
1 1/2 cup   brown sugar
3-4 Tbsp   cinnamon powder
1/2 cup      butter, softened


  1. Heat the oven to about 250 F for only 2-5 minutes.  Turn off.  Be sure it's not too hot or else the dough will cook while rising.
  2. In a mixing bowl, add warm water, yeast and honey.  Stir until relatively mixed.  Let sit for 10 minutes or until the mixture begins to foam at top.
  3. Add milk and stir.  Set aside.
  4. In a separate heat-safe mixing bowl, add flour, butter, eggs, sugar and salt.  
  5. Pour the liquid mixture over the flour mixture and knead.  If you have a Kitchenaid mixer, using a kneading hook, blend for about 5 minutes until the dough as formed and leaves the sides of the bowl.  
  6. Coat your hands with a little bit of oil (so the dough doesn't stick while working) and remove the dough from the bowl.  Knead for a few times and form a ball.  Coat the bowl with some oil and place the dough back in.
  7. Place the dough into the warm oven to rise for about 45 minutes or until it has doubled in size.
  8. In the meantime, mix the brown sugar and cinnamon for the filling.
  9. Remove dough from oven and punch down.  Knead for a few times and divide dough into 2 balls.
  10. Using one ball, roll out with a rolling pin.  Form a large rectangle about 12" x 15" or until the down is about 1/2" thick.  
  11. With a spatula, spread half of the butter over the surface of the rolled out dough.  
  12. Generously spread half of the filling mixture over the butter.  Do not worry if it seems too much.  
  13. Carefully begin to roll the dough lengthwise to form a log (you will be rolling along the shorter side so that the log remains 15" long).  Once rolled into a log, gently pat it so the log is even in width. If the ends are more narrow than the centre, simple press the ends inwards with your palm and gently pat down the centre.  NOTE:  Check this link out for a nice step-by-step guide with photos on how to roll up the dough.
  14. Now, using a knife, lightly mark 1" lines along the log.  This is where you will cut the buns out.
  15. Carefully being to cut out the buns and place them in a prepared cookie sheet or baking tray.  Keep about 1 inch apart.
  16. Once all the buns are cut out and placed on the tray, place back in the warm over to rise for about 30-40 minutes.  In this time, they will double in size and the sides will begin to touch one another to appear like one large loaf.  
  17. Remove the tray from the oven and heat the oven to 350 F.  Once fully heated, place the tray back into the oven.  Bake for about 15-20 minutes or until golden on the top.  Be sure to keep an eye on them near the end of the baking time to ensure the sugar filling is not burning at the bottom.  
  18. Once baked, remove from the oven...and resist eating them right of the tray!
Serve hot as is or drizzle with your favourite icing or glaze.

ENJOY!!


Monday, April 29, 2013

Homemade Cheese-Filled Buns


I've always found breadmaking daunting.  I didn't grow up in a household in which we made homemade breads.  Roti was our staple "bread".  So, I didn't know where to start.  I tried a few recipes before but they always came out too hard or dense.  I wanted a recipe which produced thin crispy outsides and tender fluffy insides.  Was that too much to ask?  After I made the pizzas last week, a small ball of dough remained with some shredded marble cheese.  So, I decided to give it a shot, one last time...and come up with these cheese-filled buns.  They actually came out really nice!

Here's the recipe:

Homemade Cheese-Filled Buns
Makes 10-12 buns

1 batch    Honey Pizza Dough
1 cup       shredded marble cheese
1              egg
1/4 cup    milk
1/4 cup    sesame seeds
                Italiano seasoning (I use Club House brand)


  1. Gently beat the egg and milk together.  Set aside.
  2. Make the pizza dough according to instructions.  Divide dough into 10-12 small balls.
  3. Flatten one ball into a 6" patty in diameter.  
  4. Place about 2 Tbsp of cheese in the centre of the dough and fold the cheese in so that the ends of the dough are tucked in at the bottom.  
  5. Place the dough on a prepared baking tray or cookie sheet.  
  6. Repeat Steps 3-5 for the remaining balls of dough.
  7. Using a pastry brush, apply the egg-milk mixture to the tops of the buns.  
  8. Sprinkle tops with sesame seeds and Italiano seasoning.
  9. Place in a warm oven and let rise for about 20-30 minutes.
  10. Remove tray from the oven.  Heat oven to 400 F.  Then place tray back in the oven.
  11. Bake for about 20 minutes or until the tops are golden brown.
  12. Enjoy while hot!  
Variation:  You can substitute the cheese with any kind you like!  I would definitely like to try feta next time.  Also, you can add some finely diced jalapeno peppers or olives to the cheese mixture for added flavour.  YUM! 


Wednesday, April 24, 2013

Honey Pizza Dough Recipe


I got in a bread-y kinda mood 2 days ago and decided to make some pizza.  Nothing can beat fresh pizza made from fresh handmade dough...yum!  I've had this recipe for 13 years when I first started cooking on my own.  It's the only recipe I use and it's super easy!  The crust comes out crispy on the outside and soft on the inside.

Now, I make this dough in my Kitchenaid mixer but you can also use your hands to knead the dough.  There is really no difference...I'm just lazy ;)

So by popular demand, here it is:

Honey Pizza Dough Recipe
Makes 1 large pizza crust


3 1/2 cups       unbleached all purpose flour
1/4 cup            olive oil
1/2 tsp             salt
1 cup               warm water (100-120 F)
2 Tbsp             quick rise yeast (I use Fleischmann's)
2 Tbsp             honey


1.  Turn the oven on at about 250 F for about 2-5 minutes and then turn off.  The inside of the oven should be warm but not hot because you will be placing the dough in here to rise.  If it's too hot, the dough may begin to bake...which is not what you want!  If you feel that your oven is too hot, simply open the door for a moment to let the heat out.

2.  In a heat-safe mixing bowl, add flour, oil, and salt.  Set aside.  (The heat-safe bowl will be placed in the oven...which is why I suggest using such a bowl).

3.  In a separate bowl, add warm water, yeast and honey.  Stir until relatively mixed and let sit for about 10 minutes until it foams.

4.  Gently stir the liquid mixture and pour over the flour mixture.  If you have a Kitchenaid mixer, using a kneading hook, mix for about 2-5 minutes until the dough is formed and leaves the sides.  The dough should feel soft, smooth and elastic.  It should not be firm or too sticky...but if you follow the recipe exactly, it should be okay.  If you do not have a mixer, simply knead with your hands until the same consistency is achieved.

5.  Before removing the dough from the bowl, coat hands with a little bit of olive oil.  This will prevent it from sticking to your hands and fingers.  Then remove the dough from the mixing bowl.

6.  If you used a mixer, I like to knead the dough a few times with my hands and form into a ball.  NOTE:  I feel that the natural bacteria and oils in your hands helps the dough rise better...but then again, I may be wrong...lol.  Just a theory ;).

7.  Coat the inside of bowl with a little oil and place the dough back into the bowl. Rotate it a few times until the entire ball is also coated in the oil.

8.  Cover the heat-safe bowl with a lid.  I usually use a metal plate, Corningware plate or a metal lid from one of my pots.  Place the bowl into the warm oven and let dough rise for 45 minutes or until dough has doubled in size.

9.  Turn the oven on at 400 F.

10.  Remove the bowl from the oven and punch down the dough.  Knead a few times.  Then roll out using a rolling pin until it is slightly larger than the pizza pan.

11.  Place the dough into the pan.  Spread with pizza/pasta sauce, favourite toppings and shedded marble cheese onto the crust.  Place into the pan and bake for about 15-20 minutes until the crust is golden and cheese is bubbling and slightly golden.

12.  Remove from oven and let sit for 5 minutes until cheese settles.

13.  Cut into even slices and serve while hot with some refreshing salad and perhaps wings!  Yum!

Enjoy!!


TIP:  For a larger family or company, double the recipe to make 2 large pizza crusts.  For a family of 5, I always double this recipe.

**Tomorrow, I'll share the recipe for the Cheese-Filled Buns and by the end of the weekend, I'll share the recipe for the Cinnamon Buns.  Stay Tuned!!


Friday, March 15, 2013

Fluffy Pancake Recipe


I'm tired of using the boxed pancake mix.  Not only is it expensive, it's also full of ingredients I don't want my family consuming.  So, I finally found a recipe which was just to my liking.  Even if you switch all your ingredients to organic, it'll still be a fraction of the cost of any boxed mix.

You can even quadruple the recipe for the dry ingredients and store in an air-tight container.  Whenever you feel for pancakes, just pull out 2 cups of the dry mix and add the wet ingredients listed in the recipe.  Super easy and convenient!!

Go on and give it a try.  You'll never turn back!

Fluffy Pancake Recipe
2 cups        organic all-purpose flour
2 tsp           baking powder
1/2 tsp        sea salt
4 Tbsp       organic cane sugar
1 2/3 cup   organic milk
1/3 cup      organic vegetable oil
2                organic free-run eggs

1.  Mix dry ingredients in a bowl.  Then mix all the wet ingredients in a separate bowl.

2.  Mix the dry and wet ingredients together until well blended.

3.  Preheat the frying pan or skillet.  Add a few drops of oil and cook your pancakes.

Makes about 10-12 large pancakes.  Serve with pure maple syrup or homemade strawberry sauce!
YUM!


Monday, November 21, 2011

My Spicy Turkey and Gravy Recipe!


**I just wanted to repost this turkey recipe.  If you're a bit daring and like to "spice" things up, this is the recipe for you!  Enjoy!**


Well, since my search for recipes was inspired by the "All-American" (or Canadian) turkey dinners, I thought I it would make sense to post "My Desi Turkey" as the first post on this page. "Desi" loosely means anything from the Indo-Pak subcontinent.

Please note, the recipe below is written for every 2 lbs of meat. So, if you have a 14 lbs turkey, multiply this recipe 7 times. You don't necessarily have to "multiply" it using a calculator but repeat it 7 times while you are adding the spices to your bowl. I just found it most convenient keeping the recipe this way.

All of these spices can easily be found in your local Indian/Pakistani grocery shop or even in the international section of your main grocery store. The soy sauce and chili garlic sauce is not actually "desi" but its from oriental cooking. You can find it in your main grocery store. The oven bag is a wonderful little thing. It works wonders and reduces your cooking time to just about 2 hours! I can't live without this. The turkey comes out juicy on the inside and crispy on the out. Just find it in the grocery section where you they carry foils, plastic wraps, etc.

Be prepared, this is loaded with spices and is not your conventional recipe.... :) You can tone down the red chili powder to your liking or just omit it all together. Enjoy!

1 1/2 tsp garlic powder, granulated
1 tsp ginger powder
1 tsp black pepper, ground
1/2 tsp salt
1/4 tsp turmeric powder
1/2 tsp red chili powder (optional)
2 tsp lemon juice
2 tsp soy sauce
1 tsp chili garlic sauce
water

1 oven bag
1 roasting pan or large foil pan

  1. Clean your turkey and remove any excess fat. Loosen the skin from the meat using a wooden spoon and carefully make deep cuts in the breast, thighs and legs. (This will allow the spices to get into the meat really well).
  2. Mix all of the above ingredients in a bowl except for water. Slowly add water until all spices become a uniformed, thick paste.
  3. Using your hands, apply the paste under the skin and into the slits and cuts. Rub the paste on the skin as well. Rub it in well.
  4. Cover and place into the refrigderator overnight.
  5. When you are ready to cook the turkey, remove it from the refridgerator and let sit.
  6. Preheat oven to 350 F.
  7. Prepare your pan and place an oven bag in the centre. Carefully open the bag and slide the turkey into the oven bag. Follow manufacturer's directions and seal closed with the provided tie. You will have to cut a few tiny slits on the top of the oven bag for steam to escape.
  8. Place in the oven and roast according to the manufacturer's directions. (Note: it usually takes a 14 pounder to roast to perfection in about 1.5 to 2 hrs, HONEST!).
  9. Place the roasted turkey in a nice pan, cover and place on the side.
  10. Remove the excess turkey juice from the roasting pan, discard the fat drippings and place in a sauce pan. Let simmer on stove on medium.
  11. In a small bowl, add some cornstarch with cold water. Mix until uniform.
  12. While stirring, add the cornstarch paste into the sauce pan. Cook until the gravy becomes thick and dark. Serve with your turkey!
If anyone tries this, please let me know how it turned out. You can also do this to a whole chicken and it tastes great!

Saturday, November 5, 2011

Revamped Toddler Pants

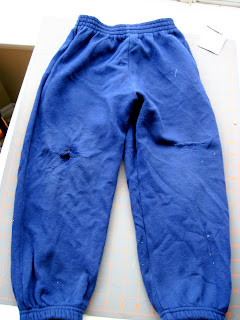
So, I have these ultra worn-down pants I'm just so very attached to. They were my son's when he was 3 years old (my 2nd child) and...umm...he's 8 now...(nothing's wrong with that though...ha, I know what you're thinking...). I guess I've been hanging on to them because of the fond memories I have of him when he was oh soooo small and cute! Well anyway, now my daughter (my 3rd child) is about that age now and I thought I was time to revamp these for her.


These pair of pants look like they are in really bad shape...well they are...in really bad shape. But I thought I would still give it a go and see what happens. Keep in mind that I loved these pants so much that I had my son wore them frontwards and backwards...so, there are knee holes on both sides. Yikes! I know what you thinking but just watch what I can do to it! And if you're like hanging on to those no-so-lovely-full-of-memory-type-of-clothes, you can do it, too! So follow along and I'll let you in on how to extend the life of these nearly-impossibly-revampable munchkin pants.


First, I chopped off the elastic ends of the bottom of the pants. They had to go...too old school! Then I simply hemmed the bottoms with a contrasting zigzag stitch to add some visual appeal.


Then for a nice feminine touch, I decided to create heart-shaped applique knee pads. I sketched one side of a nice rounded heart on the fold of a paper. I made it large enough to cover those nasty holes and a bit more for durability. Cut out that template.


I placed the template on the worn-down knees to ensure it covered the entire area plus about 1 1/2 inch to 2 inches more around the tear.

When it all seemed good, I cut out 4 hearts, one for each good ol' hole. An easy way to do this is fold the fabric, place the template against the fold and then cut. I repeated this 3 more times.

Here's my lovely heart. I just love hearts! There sooo sweet and cute.

I cut a wide strip of interface, enough to cover all 4 of my hearts.

I then placed a large scrap piece of fabric, laid down the hearts right side down, covered it with interface and pressed with a medium heat iron. (Another way to do this is place your uncut fabric wrong side and interface glued side together, press and then cut out your shapes. This would be better but I was a little impatient and wanted to see the lovely hearts on the pants first...sorry...If you look at my applique tutorial on my Beginner Sewing Techniques page, you'll find the real technique). Anyway, I peeled off the interfaced hearts from the scrap fabric before it cooled.

And, it should look like this right side up.

Now after that, I cut out all the hearts.

Here they are! Aren't they lovely??

I placed the hearts on the hole and carefully pinned them down using straight pins.

Here comes the fun part....(like my yarn? So do I!).

I took colourful yarn and applied it to the edge of the hearts as I zigzag stitched along and around the hearts. Isn't that a neat idea? It adds enough colour for the applique to pop out!

I snipped off the yarn and I'm done one knee! Yeah! After that, I just repeated the steps again for the remaining 3 knee pads.


How do you like the finished look? Ok, so it's not professional or anything but its great for another season of playwear...until it'll be time to say goodbye for good. Oh, why do our munchkins have to grow up so fast?

Monday, August 1, 2011

Ramadan Mubarak Everyone

Ramadan Mubarak everyone! Ramadan is the name of the holiest month in the Islamic Calendar. The Islamic calendar is based on the phases of the moon. This is the time of the year in which all Muslims of teen and adult age must fast for 30 days from dawn (sunrise) until dusk (sunset). They must increase their good deeds and worship during this month and continue the habit for the rest of the year until Ramadan comes again. It's a time for spiritual renewal and awakening as busy lives and obstacles may distract us throughout the year.

With Ramadan right in the middle of summer, I thought I would post a simple but refreshing recipe for a yogurt salad I love eating at iftar (the meal we eat to break our fast at sunset).

This "salad" is called Bhoondi and it's made up of tiny deep fried gram (chickpea) flour balls, fresh yogurt and some Chaat Masala (a melody of spices great for savoury indo-pak snacks).
You can find the Bhoondi and Chaat Masala at your local South-Asian grocery store or regular grocery stores have started to carry it as well in Toronto, Canada.


Here are the brands that I use. Shan for the masala and Surati for the bhoondi. All you need are the following:

1 pkg Bhoondi
1 tub yogurt (2% MF or more)
1 box Chaat Masala (Shan is best)
optional finely chopped coriander (cilantro)

1. Fill a deep bowl with bhoondi. Slowly add warm water until all the bhoondi are submerged in the water. Let sit for 10 minutes. Then drain the water.

2. Add 1 1/2 cup of yogurt to the bhoondi. Stir until all bhoondi are coated in yogurt. If it seems too dry, add more yogurt. The texture should be as pictured below.

3. Add desired amounts of Chaat Masala (kind of like salt, add to taste!). If you are not fond of foods that are too spicy, simply sprinkle a pinch or two. If you want to be daring, please add more!

4. For garnish, add chopped coriander to the top of the dish.

5. Serve immediately (it should be slightly cooler than room temperature). Refrigerate any leftovers...if you have any!

TIP: You can also add finely chopped tomatoes, green chilies, canned chickpeas to the entire mixture for added flavour and texture. Also, if one full pkg of bhoondi is too much for you, simply make half of the pkg. Save the other half for another day.

ENJOY! It's really refreshing on a hot summer day.